目录
python 3.12.1 Date:2023年12月8日
是最新的维护版本,包含自 3.12.0 以来的 400 多个错误修复、构建改进和文档更改。
1. typing的优化:
shellfrom typing import Iterable, TypeVar
T = TypeVar('T')

def max[T](args: Iterable[T]) -> T:
    ...
class list[T]:
    def __getitem__(self, index: int, /) -> T:
        ...

    def append(self, item: T) -> None:
       ...
# py_3.10是用显示声明类型别名。Point: TypeAlias = tuple[float, float]
# py_3.9以及下的版本,是用直接赋值定义类型别名,Point = Tuple[float, float]
type Point = tuple[float, float]
# type 语句专门用于声明类型别名,让代码里类型定义的意图更加清晰明确。
type Point[T] = tuple[T, T]
TypeVarTuple 和ParamSpec
shelltype IntFunc[**P] = Callable[P, int]  # ParamSpec
type LabeledTuple[*Ts] = tuple[str, *Ts]  # TypeVarTuple
type HashableSequence[T: Hashable] = Sequence[T]  # TypeVar with bound
type IntOrStrSequence[T: (int, str)] = Sequence[T]  # TypeVar with constraints
以下将结合 Python 的类型注解和类型变量相关知识,对你给出的四个类型别名定义进行详细解释。这些定义主要使用了 Python 的类型系统新特性,如 ParamSpec、TypeVarTuple、TypeVar 等,并且这些特性大多从 Python 3.10 及以上版本开始引入,部分更高级特性如 TypeVarTuple 需 Python 3.11 及以上版本支持。
1. type IntFunc[**P] = Callable[P, int] # ParamSpec
pythonfrom typing import Callable, ParamSpec

P = ParamSpec('P')
type IntFunc[**P] = Callable[P, int]

# 示例函数
def add(a: int, b: int) -> int:
    return a + b

# 使用类型别名注解
func: IntFunc[[int, int]] = add
- 含义:此类型别名
IntFunc借助ParamSpec(P)来表示一个可调用对象(函数),该对象可以接受任意数量和类型的参数(P代表参数规范),但返回值类型必须是int。 - 用途:当你需要定义一系列函数,它们的返回值都是整数,不过参数类型和数量不确定时,就可以使用这个类型别名进行类型注解。
2. type LabeledTuple[*Ts] = tuple[str, *Ts] # TypeVarTuple
pythonfrom typing import TypeVarTuple

Ts = TypeVarTuple('Ts')
type LabeledTuple[*Ts] = tuple[str, *Ts]

# 示例元组
labeled_int_tuple: LabeledTuple[int] = ('label', 1)
labeled_int_str_tuple: LabeledTuple[int, str] = ('label', 1, 'value')
- 含义:
LabeledTuple是一个泛型类型别名,利用TypeVarTuple(Ts)表示它可以包含任意数量和类型的元素。这个元组的第一个元素类型固定为str,后续元素的类型由Ts决定。 - 用途:当你需要创建带有标签的元组,且标签之后的元素数量和类型不固定时,可使用此类型别名。
3. type HashableSequence[T: Hashable] = Sequence[T] # TypeVar with bound
pythonfrom collections.abc import Sequence
from typing import TypeVar
from collections.abc import Hashable

T = TypeVar('T', bound=Hashable)
type HashableSequence[T: Hashable] = Sequence[T]

# 示例序列
hashable_list: HashableSequence[int] = [1, 2, 3]
- 含义:
HashableSequence是一个泛型类型别名,TypeVar(T)被约束为Hashable类型,意味着T必须是可哈希的类型。该类型别名表示一个序列,序列中的元素类型为可哈希的T。 - 用途:当你需要处理包含可哈希元素的序列时,可使用此类型别名,确保序列中的元素都能用于需要可哈希对象的场景,如作为字典的键。
4. type IntOrStrSequence[T: (int, str)] = Sequence[T]
pythonfrom collections.abc import Sequence
from typing import TypeVar

T = TypeVar('T', int, str)
type IntOrStrSequence[T: (int, str)] = Sequence[T]

# 示例序列
int_sequence: IntOrStrSequence[int] = [1, 2, 3]
str_sequence: IntOrStrSequence[str] = ['a', 'b', 'c']
- 含义:
IntOrStrSequence是一个泛型类型别名,TypeVar(T)被限制为只能是int或者str类型。该类型别名表示一个序列,序列中的元素类型只能是整数或者字符串。 - 用途:当你需要处理只包含整数或字符串元素的序列时,可使用此类型别名,增强代码的类型安全性和可读性。
这些类型别名定义借助 Python 的类型系统,能够让代码的类型注解更加灵活和精确,提高代码的可读性和可维护性。
2. 更灵活的f字符串解析
主要新功能:
-
更灵活的 f 字符串解析,允许许多以前不允许的事情 (PEP 701)。
- 引号重用:
python>>> songs = ['Take me back to Eden', 'Alkaline', 'Ascensionism'] >>> f"This is the playlist: {", ".join(songs)}" 'This is the playlist: Take me back to Eden, Alkaline, Ascensionism'- 无限制的嵌套
python>>> f"""{f'''{f'{f"{1+1}"}'}'''}""" '2'- 多行表达式和注释:
python>>> f"This is the playlist: {", ".join([ ... 'Take me back to Eden', # My, my, those eyes like fire ... 'Alkaline', # Not acid nor alkaline ... 'Ascensionism' # Take to the broken skies at last ... ])}" 'This is the playlist: Take me back to Eden, Alkaline, Ascensionism'- 反斜杠和unicode字符:
python>>> print(f"This is the playlist: {"\n".join(songs)}") This is the playlist: Take me back to Eden Alkaline Ascensionism >>> print(f"This is the playlist: {"\N{BLACK HEART SUIT}".join(songs)}") This is the playlist: Take me back to Eden♥Alkaline♥Ascensionism-
错误更加准确
但错误消息不包括错误在行中的确切位置,并且还人为地将表达式括在括号中。在 Python 3.12 中,由于使用 PEG 解析器解析 f 字符串,因此错误消息可以更精确并显示整行:
python>>> my_string = f"{x z y}" + f"{1 + 1}"
  File "<stdin>", line 1
  my_string = f"{x z y}" + f"{1 + 1}"
               ^^^
SyntaxError: invalid syntax. Perhaps you forgot a comma?
3. 支持python代码中的缓冲区协议
- 支持 Python 代码中的缓冲区协议 (PEP 688)
4. 每个解释器GIL
PEP 684 引入了按解释者指定的 GIL,因此现在可以为每个解释者创建具有唯一 GIL 的子解释器。这允许 Python 程序充分利用多个 CPU 内核。目前只能通过 C-API 使用,但预计 3.13 中将提供 Python API。
从结果来看:多解释器的运行时间,提高了60倍,期待3.13的提升。可以考虑在CPU的密集型任务当中,加入此功能(改成一个装饰器)
pythonimport time
import multiprocessing
import ctypes

# 加载 Python 动态链接库
python_lib = ctypes.CDLL(None)

# 定义 PyInterpreterConfig 结构体
class PyInterpreterConfig(ctypes.Structure):
    _fields_ = [
        ("check_multi_interp_extensions", ctypes.c_int),
        ("gil", ctypes.c_int)
    ]

# 定义常量
PyInterpreterConfig_OWN_GIL = 1

# 定义函数原型
python_lib.Py_NewInterpreterFromConfig.argtypes = [ctypes.POINTER(ctypes.c_void_p), ctypes.POINTER(PyInterpreterConfig)]
python_lib.Py_NewInterpreterFromConfig.restype = ctypes.c_int

python_lib.PyStatus_Exception.argtypes = [ctypes.c_int]
python_lib.PyStatus_Exception.restype = ctypes.c_int

# 模拟 CPU 密集型任务
def cpu_intensive_task():
    start_time = time.time()
    while time.time() - start_time < 5:
        _ = 1 + 1

# 单解释器运行任务
def single_interpreter():
    cpu_intensive_task()

# 多解释器运行任务
def multi_interpreter():
    config = PyInterpreterConfig()
    config.check_multi_interp_extensions = 1
    config.gil = PyInterpreterConfig_OWN_GIL

    tstate = ctypes.c_void_p()
    status = python_lib.Py_NewInterpreterFromConfig(ctypes.byref(tstate), ctypes.byref(config))
    if python_lib.PyStatus_Exception(status):
        return -1
    cpu_intensive_task()

if __name__ == "__main__":
    num_cores = multiprocessing.cpu_count()

    # 单解释器测试
    single_start_time = time.time()
    processes = [multiprocessing.Process(target=single_interpreter) for _ in range(num_cores)]
    for p in processes:
        p.start()
    for p in processes:
        p.join()
    single_end_time = time.time()
    single_total_time = single_end_time - single_start_time

    # 多解释器测试
    multi_start_time = time.time()
    processes = [multiprocessing.Process(target=multi_interpreter) for _ in range(num_cores)]
    for p in processes:
        p.start()
    for p in processes:
        p.join()
    multi_end_time = time.time()
    multi_total_time = multi_end_time - multi_start_time

    print(f"单解释器总时间: {single_total_time} 秒")
    print(f"多解释器总时间: {multi_total_time} 秒")
    if multi_total_time < single_total_time:
        print("多解释器利用多核 CPU 更高效。")
    else:
        print("单解释器和多解释器性能相近或单解释器更优。")


""""
运行结果:
单解释器总时间: 6.34592080116272 秒
多解释器总时间: 0.10944199562072754 秒
多解释器利用多核 CPU 更高效。
"""
5. 理解式内联
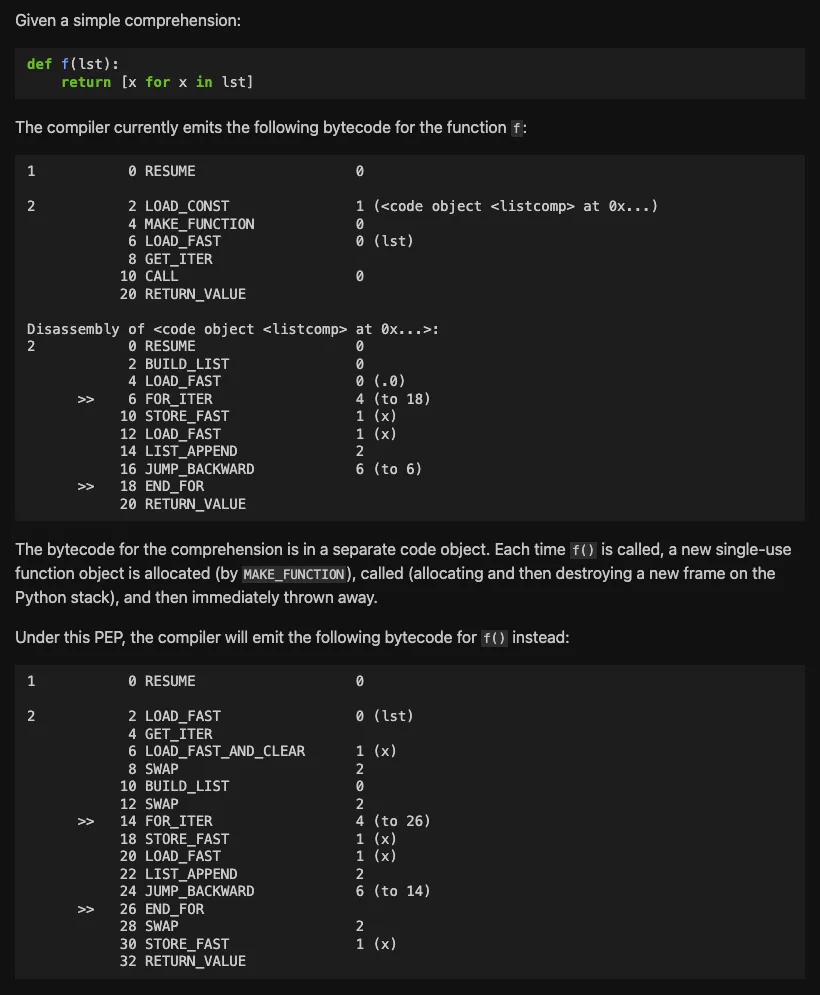
从详细的图片可以看出,之前的版本会在列表推导式、字典推导式,进行创建一个一次性函数对象,用完之后,进行丢弃。
而新的版本是:不需要单独的代码对象,也不再需要创建一次性的函数对象,也不再需要创建和销毁python框架。
locals包含外部变量
python>>> def f(lst):
...    return [locals() for x in lst]
...
>>> f(1)
Traceback (most recent call last):
  File "<stdin>", line 1, in <module>
  File "<stdin>", line 2, in f
TypeError: 'int' object is not iterable
>>> f([1])
[{'lst': [1], 'x': 1}]
>>>
对比3.11
pythonPython 3.11.10 (main, Oct  3 2024, 02:37:52) [Clang 14.0.6 ] on darwin
Type "help", "copyright", "credits" or "license" for more information.
>>> def f(lst):
... ...    return [locals() for x in lst]
  File "<stdin>", line 2
    ...    return [locals() for x in lst]
    ^
IndentationError: expected an indented block after function definition on line 1
>>> def f(lst):
...    return [locals() for x in lst]
...
>>> f([1])
[{'.0': <list_iterator object at 0x10cb4e0b0>, 'x': 1}]
>>>
6. 与TypeHint相关的新功能
- PEP 692: 使用 TypedDict 进行更精确的 **kwargs 类型 在 PEP 484 引入的函数签名中键入 **kwargs 仅在所有 **kwargs 都属于相同类型的情况下才允许有效注释。
PEP 692 指定了一种更精确的键入 **kwargs 的方法,它依赖于类型化的字典:
pythonfrom typing import TypedDict, Unpack

class Movie(TypedDict):
  name: str
  year: int

def foo(**kwargs: Unpack[Movie]): ...
- PEP 698: 覆盖静态类型的装饰器
增加一种,可以检查覆盖父类方法的,是否有调用。如果去掉override,在badchild中他是没有get_color,她就会调用base的方法。但实际上,你写的代码是为了调用badChild的。
so,这个方法还是对于你要覆盖父类方法有很大的用处
pythonfrom typing import override

class Base:
  def get_color(self) -> str:
    return "blue"

class GoodChild(Base):
  @override  # ok: overrides Base.get_color
  def get_color(self) -> str:
    return "yellow"

class BadChild(Base):
  @override  # type checker error: does not override Base.get_color
  def get_colour(self) -> str:
    return "red"


good = GoodChild()
bad = BadChild()
print(good.get_color())
print(bad.get_color())
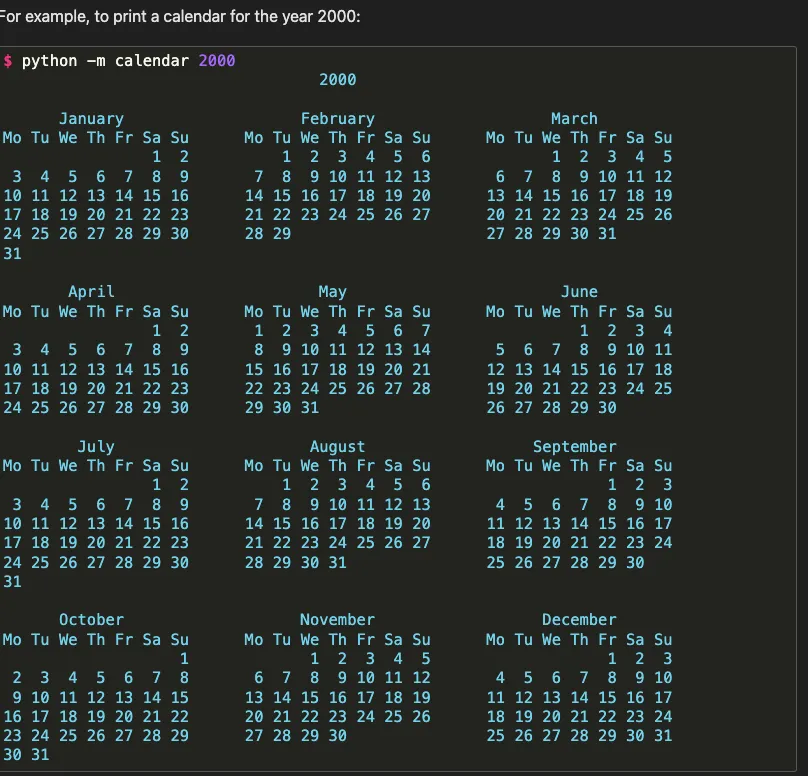
7. canlendar的使用,增加月和日
8. itertools.batched,批量储量
将列表、字符串,批量分割成你规定的大小
pythonflattened_data = ['roses', 'red', 'violets', 'blue', 'sugar', 'sweet']
unflattened = list(batched(flattened_data, 2))
unflattened
[('roses', 'red'), ('violets', 'blue'), ('sugar', 'sweet')]

# batched('ABCDEFG', 3) → ABC DEF G

h
反过来:合并的方法是: itertools.chain(*iterables)
9. os.path.splitroot(path)
将路径名路径拆分为一个 3 项元组 (drive, root, tail),其中 drive 是设备名称或挂载点,root 是驱动器后面的一串分隔符,tail 是 root 之后的所有内容。这些项中的任何一项都可能是空字符串。在所有情况下,drive + root + tail 都将与 path 相同。
看情况,用起来是有点不准的。哈哈
pythonsplitroot('C:/Users/Sam')
('C:', '/', 'Users/Sam')
splitroot('//Server/Share/Users/Sam')
('//Server/Share', '/', 'Users/Sam')
10. unittest,添加--durations,显示N个最慢的测试用例
pythonpython3 -m unittest --durations=3 lib.tests.test_threading
.....
Slowest test durations
----------------------------------------------------------------------
1.210s     test_timeout (Lib.test.test_threading.BarrierTests)
1.003s     test_default_timeout (Lib.test.test_threading.BarrierTests)
0.518s     test_timeout (Lib.test.test_threading.EventTests)

(0.000 durations hidden.  Use -v to show these durations.)
----------------------------------------------------------------------
Ran 158 tests in 9.869s

OK (skipped=3)
11. uuid增加command-line 功能
python# generate a random uuid - by default uuid4() is used
$ python -m uuid

# generate a uuid using uuid1()
$ python -m uuid -u uuid1

# generate a uuid using uuid5
$ python -m uuid -u uuid5 -n @url -N example.com
将来有时间再加上3.12之前的PEP,还是挺有意思的👂🏻
本文作者:Eric
本文链接:
版权声明:本博客所有文章除特别声明外,均采用 BY-NC-SA 许可协议。转载请注明出处!